Chocolate Easter Egg Nest Cake: A Delightful Treat for the Season
As Easter approaches, many families begin thinking about the desserts and sweets that will adorn their tables. Among the most popular and whimsical treats that take center stage is the Chocolate Easter Egg Nest Cake. This decadent dessert not only embodies the spirit of Easter with its charming, nest-like design but also offers a rich and indulgent taste that makes it perfect for family gatherings and festive celebrations.
In this blog post, we’ll delve into the art of creating a Chocolate Easter Egg Nest Cake, covering everything from the origins of the cake to the ingredients, baking tips, and step-by-step instructions to help you craft this delightful treat. Whether you’re an experienced baker or a beginner, this guide will help you create a dessert that’s both visually stunning and irresistibly delicious.
The Origins of Easter Cakes
Easter is a holiday steeped in tradition, with many symbolic foods associated with its celebrations. Historically, Easter has been a time of feasting, particularly following the austerity of Lent, during which many people refrained from indulging in rich foods. Cakes have long been a staple during this time, often representing the end of the fasting period and the beginning of joyful celebrations.
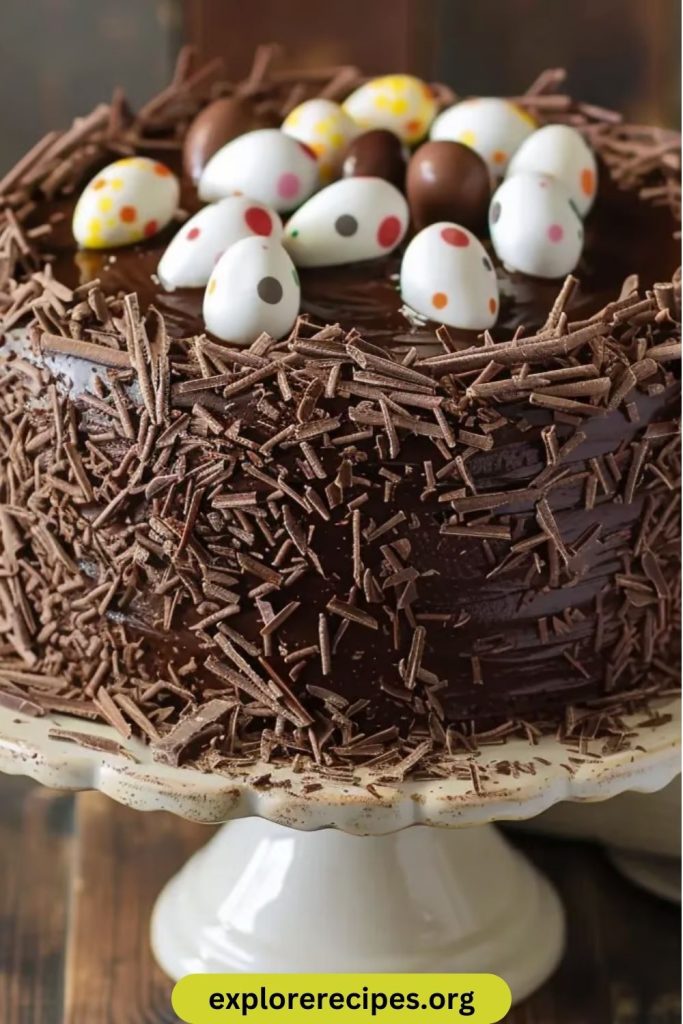
The Chocolate Easter Egg Nest Cake draws on many of these traditional ideas but adds a modern twist with its playful design and indulgent ingredients. Eggs have always been a symbol of fertility and renewal, and chocolate eggs, in particular, are a quintessential part of Easter celebrations around the world. Combining these elements into a cake makes for a festive and indulgent dessert that is perfect for the season.This Chocolate Easter Egg Nest Cake transforms a rich, moist chocolate cake into a stunning holiday centerpiece. The cake itself has an incredibly tender crumb thanks to the buttermilk and hot coffee that enhance the deep chocolate flavor. What makes this dessert special is the elegant presentation – a smooth, glossy ganache coating provides the perfect backdrop for the handcrafted chocolate nest that crowns the cake. This edible nest, delicately piped with strands of dark chocolate, creates a festive home for colorful mini Easter eggs. Perfect for Easter celebrations or spring gatherings, this showstopper combines impressive visual appeal with classic chocolate decadence that will delight guests of all ages.
Why Chocolate Easter Egg Nest Cake?
The Chocolate Easter Egg Nest Cake offers several advantages that make it the perfect Easter dessert. First and foremost, it is visually captivating. With its delicate chocolate nest and vibrant candy eggs, it serves as a stunning centerpiece for any Easter celebration. Beyond its appearance, it is a versatile treat that can be customized to suit a variety of tastes. Whether you prefer dark, milk, or white chocolate, you can adjust the flavor profile to your preference.
Additionally, the cake is incredibly easy to make, with minimal preparation required. The rich, chocolate flavor pairs wonderfully with a light, fluffy cake base, and the contrast of textures — the soft cake, creamy frosting, and crunchy chocolate nest — provides a delightful experience with every bite. The cake also allows for creativity in decoration, whether you opt for traditional candy eggs or more exotic fillings like mini chocolate bunnies or pastel-colored candies.
Key Ingredients for the Chocolate Easter Egg Nest Cake
The ingredients for the Chocolate Easter Egg Nest Cake are simple yet decadent, and they can be found in most well-stocked grocery stores. Let’s break down the essential ingredients and their role in creating this indulgent dessert.
Cake Ingredients:
- All-purpose flour: The foundation of the cake. You’ll need a good balance of flour to give the cake structure while keeping it moist and light.
- Cocoa powder: This adds the rich chocolate flavor to the cake, giving it the deep, indulgent taste that is essential for any Easter dessert.
- Baking powder: This will help the cake rise and stay light and fluffy.
- Butter: Used for the batter, butter adds richness and moisture to the cake.
- Sugar: Sweetens the cake and enhances the chocolate flavor.
- Eggs: Eggs help bind the ingredients together, contributing to the cake’s texture and moisture.
- Vanilla extract: For a hint of aromatic sweetness.
- Buttermilk: Helps to keep the cake tender and moist, while also providing a slightly tangy flavor that balances the sweetness.
Frosting Ingredients:
- Cream cheese: The base of the frosting, providing both tanginess and smoothness.
- Powdered sugar: Sweetens the frosting and helps achieve the right consistency.
- Butter: Adds creaminess to the frosting, making it smooth and easy to spread.
- Vanilla extract: Enhances the flavor of the frosting, adding depth and sweetness.
Nest Ingredients:
- Chocolate (dark, milk, or white): The key ingredient to create the nest. Choose a high-quality chocolate for the best flavor and texture.
- Shredded coconut: This will create the textured nest effect when combined with the melted chocolate. If you prefer a different texture, you can substitute with crushed graham crackers or even cornflakes.
Decorative Eggs:
- Mini chocolate Easter eggs or candy-coated chocolates: These will fill the chocolate nest, completing the look of an Easter nest and adding a sweet, colorful touch.
Step-by-Step Instructions for Making the Chocolate Easter Egg Nest Cake
Now that you understand the essential ingredients, let’s walk through the steps of making this show-stopping Easter dessert. The process is simple, but the result is nothing short of spectacular.
Step 1: Prepare the Cake Base
- Preheat your oven to 350°F (175°C). Grease and flour two 8-inch round cake pans or line them with parchment paper.
- In a large bowl, sift together the flour, cocoa powder, and baking powder. This ensures that the dry ingredients are evenly distributed and free of clumps.
- In a separate bowl, cream together the butter and sugar until light and fluffy. This can take about 3–5 minutes using an electric mixer on medium speed.
- Add the eggs one at a time, mixing well after each addition. Add the vanilla extract and continue mixing.
- Gradually add the dry ingredients to the wet mixture, alternating with the buttermilk. Begin and end with the dry ingredients, mixing until just combined. Be careful not to overmix, as this can make the cake dense.
- Divide the batter evenly between the prepared cake pans and smooth the tops with a spatula.
- Bake in the preheated oven for 25–30 minutes or until a toothpick inserted into the center of the cake comes out clean. Allow the cakes to cool in the pans for 10 minutes before transferring them to a wire rack to cool completely.
Step 2: Make the Frosting
- In a mixing bowl, beat the cream cheese and butter until smooth and creamy.
- Gradually add the powdered sugar, one cup at a time, beating well after each addition. Continue beating until the frosting is smooth and fluffy.
- Add the vanilla extract and mix until incorporated. If the frosting is too thick, you can add a tablespoon of milk to achieve the desired consistency.
Step 3: Create the Chocolate Nest
- Melt the chocolate in a heatproof bowl over a pot of simmering water (double boiler method) or in the microwave, stirring every 30 seconds until smooth and melted.
- Once melted, stir in the shredded coconut (or your chosen texture element). Mix well until the coconut is evenly coated with chocolate.
- Allow the chocolate mixture to cool slightly, then carefully form a nest shape on top of the cake. You can use a spoon or your hands to arrange the mixture into a circular nest shape, leaving a small indentation in the center for the eggs.
- Set the nest aside to cool and harden.
Step 4: Assemble the Cake
- Once the cakes are completely cool, place one cake layer on a serving plate. Spread a layer of frosting over the top.
- Place the second cake layer on top and frost the entire cake with the cream cheese frosting, smoothing it out evenly.
- Gently place the chocolate nest on top of the cake, positioning it in the center.
- Fill the nest with mini chocolate Easter eggs or colorful candy-coated chocolates.
- Garnish the base of the cake with additional coconut or edible flowers for a festive touch.
Step 5: Serve and Enjoy!
Your Chocolate Easter Egg Nest Cake is now ready to be served! Slice into the cake and enjoy the rich, chocolatey goodness paired with the creamy frosting and crunchy nest. It’s a treat that’s sure to impress both visually and in terms of taste.
Tips for Success
- Use high-quality chocolate: The flavor of the chocolate is one of the most important elements of this cake. Choose a good quality chocolate for the nest and cake for the best flavor and texture.
- Customize the filling: While mini chocolate eggs are traditional, feel free to get creative with your filling. Try filling the nest with colorful jelly beans, chocolate bunnies, or even mini marshmallows for a fun twist.
- Chill the frosting: If the frosting is too soft and difficult to work with, refrigerate it for 20–30 minutes to firm it up before applying it to the cake.
- Allow the cake to cool completely: This step is crucial to prevent the frosting from melting or sliding off the cake.
Conclusion
The Chocolate Easter Egg Nest Cake is a beautiful and delicious way to celebrate Easter. Its rich chocolate flavor, creamy frosting, and whimsical nest design make it a dessert everyone will love. Whether you’re hosting a family gathering, a festive brunch, or just treating yourself and your loved ones to a special Easter treat, this cake is sure to impress. Follow the steps outlined in this guide, and you’ll have a show-stopping dessert that’s as delightful to make as it is to eat. Happy baking, and enjoy your festive creation!
4o