Chocolate-Covered Easter Oreos: A Deliciously Sweet Spring Treat
Easter is a time for family gatherings, celebration, and indulging in delicious treats. And one treat that never fails to delight both kids and adults alike is the humble Oreo cookie. But what if you took this beloved snack and gave it a decadent upgrade? Enter Chocolate-Covered Easter Oreos, the perfect way to elevate a classic favorite into a festive springtime indulgence.
These treats are a true crowd-pleaser, and with a few simple ingredients and a bit of creativity, you can create stunning chocolate-covered Oreos that not only taste divine but also make for beautiful Easter gifts or party favors. Whether you’re hosting a family gathering, attending an Easter brunch, or simply looking for a sweet snack to enjoy during the holiday, these chocolate-covered Oreos will bring a touch of elegance to your celebration.
In this blog post, we will walk you through the entire process of making these mouthwatering treats, from selecting the right ingredients to decorating them with a festive flair. You’ll also find some tips and tricks to ensure that your Easter Oreos come out perfectly every time.
Why Chocolate-Covered Oreos?
There’s something magical about the combination of crispy, crunchy cookies and smooth, silky chocolate. The contrast in textures makes every bite an irresistible experience. But when you add a holiday twist to this classic combo, like Easter-themed decorations and colors, you’ve got a treat that becomes a conversation starter and a real showstopper.
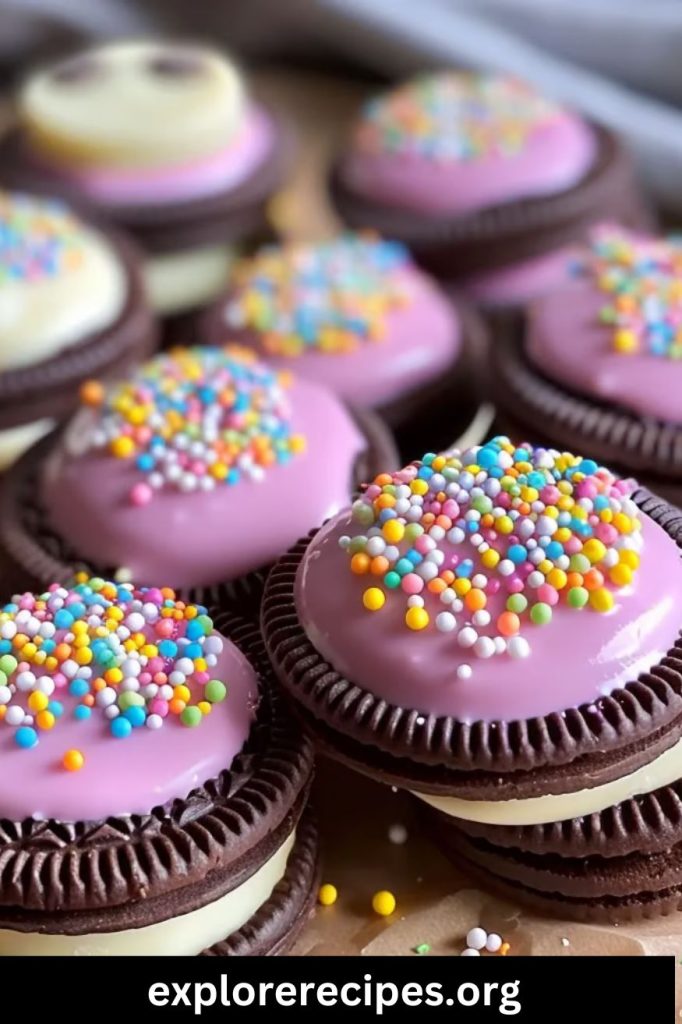
The magic of chocolate-covered Oreos lies not only in their incredible flavor but also in how versatile they are. You can make them as fancy or as simple as you like, using different types of chocolate (dark, milk, or white), and customizing the decorations to suit the theme of your occasion. For Easter, you can decorate your cookies with pastel-colored sprinkles, mini eggs, or even edible glitter to make them look as good as they taste.
Additionally, chocolate-covered Oreos make a fantastic homemade gift idea. Whether wrapped in a cute bag or placed in a decorative box, they exude that personal touch that store-bought candies just can’t match. Let’s take a deeper dive into what makes these treats so special and how you can make them yourself.
What You’ll Need: Ingredients for Chocolate-Covered Easter Oreos
The best part about making these chocolate-covered Oreos is that the ingredients are incredibly simple and easy to find. No need for advanced culinary skills—just a few pantry staples and a little creativity. Here’s what you’ll need to get started:
1. Oreos
You can’t make chocolate-covered Oreos without Oreos! The classic, original flavor works best, but feel free to experiment with different varieties, such as double-stuffed Oreos or seasonal flavors (like carrot cake or mint). If you’re looking to make a gluten-free version, there are also gluten-free Oreo alternatives available at most grocery stores.
2. Chocolate
The type of chocolate you choose will make all the difference. You can use milk chocolate, dark chocolate, or white chocolate based on your preference. If you’re looking for a rich and decadent flavor, go with dark chocolate. For a sweeter, creamier treat, milk chocolate is a great option. If you want to add a bright, festive touch, white chocolate is the way to go. For best results, use high-quality chocolate bars or melting wafers.
3. Sprinkles and Decorations
This is where you can get creative! Easter-themed decorations like pastel-colored sprinkles, mini candy eggs, and edible glitter will give your chocolate-covered Oreos that seasonal flair. You can also use a variety of decorations, such as coconut flakes, colored sugar, or even crushed nuts for added texture and visual appeal.
4. Lollipop Sticks (Optional)
If you want to turn your chocolate-covered Oreos into fun “cookies on a stick,” consider using lollipop sticks. These are especially great for gift-giving or Easter egg hunts. They make the treats easier to handle and add a touch of fun to the presentation.
5. Parchment Paper or Wax Paper
To ensure that your chocolate-covered Oreos don’t stick to the surface as they set, it’s a good idea to line your work area with parchment paper or wax paper. This will make cleanup a breeze and ensure that the coating sets evenly.
How to Make Chocolate-Covered Easter Oreos: Step-by-Step Instructions
Now that you’ve gathered your ingredients, let’s get to the fun part—making these delicious treats! Here’s a simple step-by-step guide to help you create the perfect chocolate-covered Easter Oreos.
Step 1: Prepare Your Workspace
Before you begin, make sure you have a clean, flat surface to work on. Lay down a sheet of parchment or wax paper to catch any drips and prevent the chocolate from sticking. This will make the process more efficient and allow your treats to set without sticking.
Step 2: Melt the Chocolate
The first step in creating your chocolate-covered Oreos is melting the chocolate. You can do this in a few different ways:
- Microwave Method: Place the chocolate in a microwave-safe bowl and heat in 30-second intervals, stirring after each interval, until fully melted and smooth.
- Double Boiler Method: Alternatively, melt the chocolate using a double boiler. Fill a saucepan with a small amount of water and bring it to a simmer. Place a heatproof bowl on top of the saucepan (making sure the bowl doesn’t touch the water), and stir the chocolate until smooth.
Regardless of which method you use, be sure to avoid overheating the chocolate, as it can become grainy or seize up. The key is to melt it slowly and gently, stirring frequently.
Step 3: Dip the Oreos in Chocolate
Once the chocolate is melted and smooth, it’s time to start dipping your Oreos! Using a fork or dipping tool, submerge one Oreo into the melted chocolate, making sure it’s completely covered. Gently tap the fork on the side of the bowl to remove any excess chocolate.
If you’re using lollipop sticks, now is the time to insert the stick into the filling of the Oreo before dipping it in the chocolate. This will help the stick stay in place.
Step 4: Add Decorations
Once your Oreo is dipped and coated in chocolate, it’s time to add some festive flair. While the chocolate is still wet, sprinkle on pastel-colored sprinkles, mini candy eggs, edible glitter, or any other Easter-themed decoration you desire. You can even drizzle contrasting chocolate (like white chocolate over dark chocolate) for added design.
Be sure to add your decorations immediately, as the chocolate sets quickly and you don’t want to miss your window of opportunity.
Step 5: Let the Chocolate Set
After decorating, place each Oreo on the parchment or wax paper and allow the chocolate to set completely. You can speed up the process by placing the Oreos in the fridge for about 15 to 20 minutes, or simply leave them at room temperature for 30 to 45 minutes, depending on how quickly your environment is cooling the chocolate.
Step 6: Serve and Enjoy!
Once the chocolate has fully set, your chocolate-covered Easter Oreos are ready to be enjoyed! They are perfect for an Easter brunch, springtime parties, or as a homemade gift wrapped up in a cute treat bag or box. You can also store them in an airtight container at room temperature for up to a week—if they last that long!
Tips for Perfect Chocolate-Covered Oreos
To ensure your chocolate-covered Oreos turn out perfectly every time, here are a few tips to keep in mind:
- Use High-Quality Chocolate: The better the chocolate, the better the taste. Opt for high-quality chocolate bars or chocolate wafers for a smoother, more flavorful coating.
- Don’t Overheat the Chocolate: Whether using the microwave or a double boiler, avoid overheating the chocolate. Slow and steady melting will give you the best results.
- Cool the Oreos Before Decorating: If you want to avoid having decorations that sink into the chocolate, be sure the chocolate has set slightly before you add sprinkles or other toppings.
- Use a Clean Fork: When dipping your Oreos, use a clean fork or dipping tool to avoid getting chocolate on your hands. This will make the process easier and cleaner.
Why These Chocolate-Covered Oreos Are Perfect for Easter
Easter is a time for celebration, and what better way to celebrate than with a sweet treat that embodies the spirit of the holiday? Chocolate-covered Oreos are an easy, fun, and delicious way to add a festive touch to your Easter celebrations. Whether you’re crafting these as a family project or preparing them as an edible gift, they’re sure to be a hit with everyone.
Not only do they offer an explosion of flavor, but they also provide a perfect canvas for seasonal creativity. The colorful decorations, combined with the creamy, crispy chocolate-covered Oreo, make for a treat that everyone will remember. And with their simple preparation and customizability, these treats will quickly become a staple at your Easter table.
Final Thoughts
Chocolate-covered Easter Oreos are more than just a dessert—they’re a symbol of the joy, fun, and creativity that the Easter season brings. With just a few simple ingredients and some festive imagination, you can turn an ordinary Oreo into a delectable holiday treat that will impress your guests and satisfy your sweet tooth. Whether you’re hosting an Easter brunch, attending a spring gathering, or simply looking for a way to share some joy, these chocolate-covered Oreos are the perfect way
4o