Ultimate Homemade Rainbow Ice Cream Recipe: A Vibrant Delight for Your Taste Buds
Homemade ice cream brings an undeniable charm to any occasion. The joy of creating a creamy, delicious frozen treat from scratch is unparalleled, especially when the result is a colorful masterpiece like rainbow ice cream. With its vibrant layers of red, orange, yellow, green, blue, and purple, rainbow ice cream is as much a visual treat as it is a culinary one. Whether you’re making it for a special celebration or just indulging in a colorful dessert for yourself, this ultimate homemade rainbow ice cream recipe is sure to impress.
In this blog post, we’ll guide you step by step on how to make the most decadent, creamy, and colorful rainbow ice cream. We’ll explore the ingredients, the preparation process, and helpful tips to ensure your ice cream turns out perfect every time. Get ready to embark on a delicious journey of colors and flavors, and learn how to create an unforgettable treat.
Why Choose Homemade Rainbow Ice Cream?
There’s something uniquely satisfying about making ice cream at home. Not only do you get to customize the flavors, but you also have full control over the ingredients, allowing you to avoid artificial additives and preservatives found in store-bought ice cream. Homemade ice cream tends to be creamier and fresher, thanks to the use of high-quality ingredients.
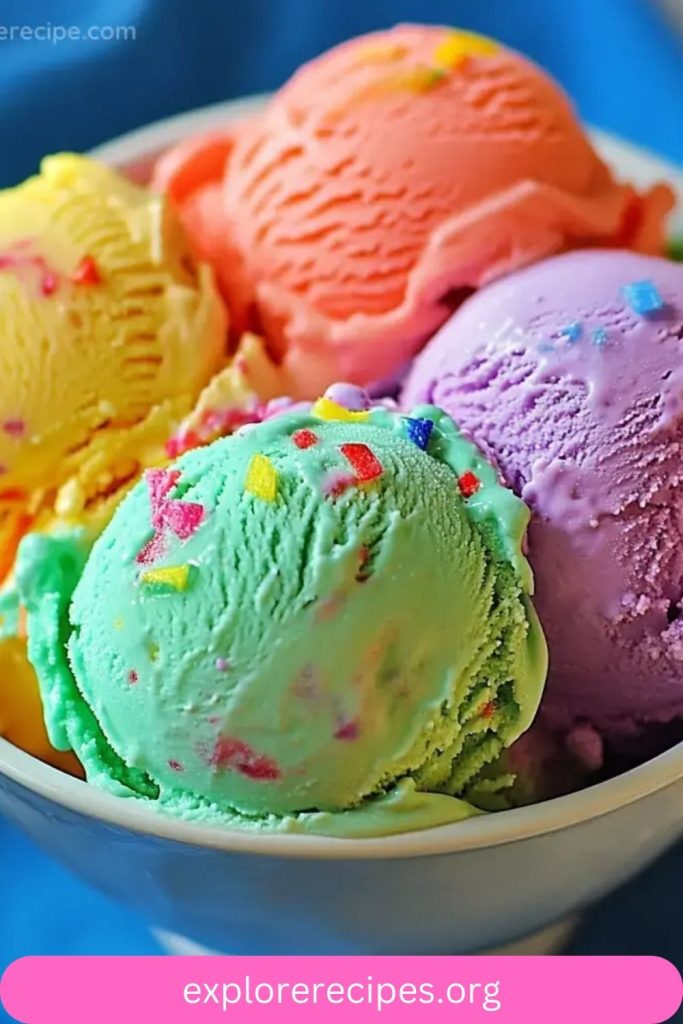
Rainbow ice cream, in particular, is an exciting way to showcase your creativity. The different color layers offer the opportunity to experiment with various flavors and combinations, giving you a personalized ice cream experience. Whether you’re creating it for a birthday party, a special family gathering, or just for fun, homemade rainbow ice cream is sure to stand out.The Ultimate Homemade Rainbow Ice Cream is a fun and visually stunning dessert that’s perfect for any occasion. This recipe starts with a rich and creamy vanilla ice cream base, which is then divided and tinted with vibrant food colors to create a beautiful rainbow effect. Whether you’re using an ice cream maker or a no-churn method, this ice cream is easy to make and guaranteed to impress. The layers of colorful ice cream can be swirled together for a marbled look or layered for a classic rainbow effect. Perfect for birthday parties, celebrations, or just as a cheerful treat, this ice cream is sure to be a hit with kids and adults alike. Serve it in bowls or cones, and watch as everyone enjoys this delightful, homemade creation.
Ingredients for the Ultimate Homemade Rainbow Ice Cream
Before we get into the recipe, let’s take a look at the ingredients you’ll need. While the list may seem long due to the number of layers, the ingredients are straightforward and easy to find in most grocery stores.
For the Ice Cream Base:
- 2 cups heavy cream (chilled)
- 1 cup whole milk (chilled)
- ¾ cup granulated sugar
- 1 tablespoon pure vanilla extract
- A pinch of salt
For the Colorful Layers (Choose the colors/flavors you prefer):
- Food coloring (red, orange, yellow, green, blue, and purple)
- Natural fruit purees or flavoring (optional for extra flavor)
- Raspberry or strawberry puree for red
- Orange juice or zest for orange
- Lemon zest or lemon juice for yellow
- Matcha powder or mint extract for green
- Blueberry or spirulina powder for blue
- Purple yam or acai powder for purple
Step-by-Step Guide to Making Homemade Rainbow Ice Cream
Making homemade rainbow ice cream involves several stages, but don’t worry—it’s not difficult! This step-by-step guide will walk you through everything from creating the ice cream base to layering the colorful goodness.
1. Prepare the Ice Cream Base:
The first step in making rainbow ice cream is creating the base, which will be the foundation for each colorful layer. The base consists of cream, milk, sugar, vanilla extract, and a pinch of salt. Follow these steps for a smooth and creamy base.
- In a large mixing bowl, combine the heavy cream, whole milk, sugar, vanilla extract, and salt.
- Use an electric mixer or whisk to blend everything together until the mixture becomes smooth, and the sugar dissolves completely.
- Continue to whisk until the mixture reaches a light, fluffy consistency.
- Once done, cover the bowl and refrigerate it for at least 30 minutes to chill the base.
2. Divide the Base into Separate Bowls:
To create the rainbow layers, you’ll need to divide the ice cream base into several portions, one for each color of the rainbow. The number of bowls you need will depend on how many layers you want to make. Typically, rainbow ice cream has six layers, each representing a color of the rainbow.
Use a spoon to scoop the chilled ice cream base into separate bowls. You’ll need six bowls for six colors, but feel free to adjust depending on how many layers you’d like.
3. Add Color and Flavor to Each Bowl:
Now comes the fun part—adding color and flavor to each bowl! For this, you’ll need food coloring, fruit purees, or other natural flavorings to customize the colors and tastes of your rainbow layers. Here’s how to color and flavor each layer:
- Red Layer: Add 2–3 drops of red food coloring to the first bowl, and mix well. For a natural flavor, you can add raspberry or strawberry puree.
- Orange Layer: Add 2–3 drops of orange food coloring to the second bowl, and mix. For a natural touch, you can incorporate a bit of orange juice or orange zest.
- Yellow Layer: Add 2–3 drops of yellow food coloring, and stir well. You can add lemon zest or lemon juice for an extra burst of citrus flavor.
- Green Layer: Add 2–3 drops of green food coloring, and mix well. Matcha powder or mint extract will give this layer a refreshing green flavor.
- Blue Layer: Add 2–3 drops of blue food coloring, and stir. You can also use blueberry puree or spirulina powder for a more natural blue hue.
- Purple Layer: Add 2–3 drops of purple food coloring, and stir well. Purple yam or acai powder will give the purple layer a subtle, earthy flavor.
4. Layering the Rainbow Ice Cream:
Now that each of your bowls is colorful and flavorful, it’s time to layer the ice cream. Take your first bowl of red-colored ice cream base and spoon it into the bottom of a freezer-safe container. Use a spatula to spread it evenly, ensuring the entire surface is covered.
After the red layer is spread, place the container in the freezer for 15–20 minutes to allow the layer to firm up. This will ensure that each color stays separate and doesn’t blend into the others.
Once the red layer has set, proceed with the next color (orange) and repeat the process. Add the orange layer, spread it evenly, and return the container to the freezer for 15–20 minutes. Continue this process for the remaining colors, creating a beautiful rainbow of layers.
5. Freeze and Set:
After you’ve added all the layers, cover the container with a lid or plastic wrap and return it to the freezer for several hours or overnight to allow the ice cream to firm up completely. This will give you the smooth, creamy texture that homemade ice cream is known for.
6. Serve and Enjoy:
Once your homemade rainbow ice cream has fully set, it’s time to serve! Scoop out the layers with a large spoon or ice cream scoop, and place them in bowls or cones. You’ll be treated to a stunning visual display as each scoop reveals the vibrant layers of color. Top with sprinkles, chocolate chips, or whipped cream if desired for an extra indulgent touch.
Tips for Perfect Homemade Rainbow Ice Cream
While the process of making homemade rainbow ice cream is relatively simple, a few tips can ensure your ice cream turns out perfect:
- Use Fresh, Clean Snow for Flavor: If you’re adding fruit purees or zest for flavor, use fresh ingredients to give your ice cream the best taste. The natural flavors will shine through and add to the freshness of the dessert.
- Don’t Overfill the Bowls: When dividing the ice cream base into separate bowls, be careful not to overfill each one. The mixture will expand as it freezes, so leaving a little room in each bowl will prevent spillage.
- Don’t Rush the Freezing Process: Be patient and allow each layer to set before adding the next one. This step is crucial for creating distinct color layers, so don’t skip it.
- Opt for Gel-Based Food Coloring: Gel food coloring will give your ice cream more vibrant colors compared to liquid food coloring. It’s worth investing in high-quality gel colors to achieve that perfect rainbow effect.
Variations of Homemade Rainbow Ice Cream
While the classic rainbow ice cream recipe is always a hit, there are plenty of ways to get creative with your rainbow dessert. Here are a few variations you can try:
- Rainbow Swirl Ice Cream: Instead of layering the colors, you can mix them together to create a beautiful swirl effect. This results in a marbled rainbow look that’s just as visually striking.
- Fruit-Only Rainbow Ice Cream: For a healthier, more natural version, you can make each layer using fruit purees for color and flavor. This gives the ice cream a natural sweetness while maintaining vibrant hues.
- Vegan Rainbow Ice Cream: If you follow a vegan diet, you can make a dairy-free version by substituting coconut milk or almond milk for the cream and milk, and using coconut sugar or maple syrup instead of granulated sugar.
Conclusion
The ultimate homemade rainbow ice cream recipe is a fun, creative way to celebrate the vibrant colors of life while indulging in a rich, creamy treat. By carefully layering colors and flavors, you can create a dessert that is as delightful to the eyes as it is to the taste buds. Whether you’re making it for a special event or just enjoying a summer day, this rainbow ice cream is sure to be a crowd-pleaser. So, gather your ingredients, get your freezer ready, and start making your own beautiful and delicious rainbow masterpiece today!